1995-2004 P32 Chassis J71 Parking Brake pump does not stop running.
Symptom
When I start my coach and place it into drive, with the yellow button on the dash pressed in, my parking brake pump runs but does not stop running.
Component locations
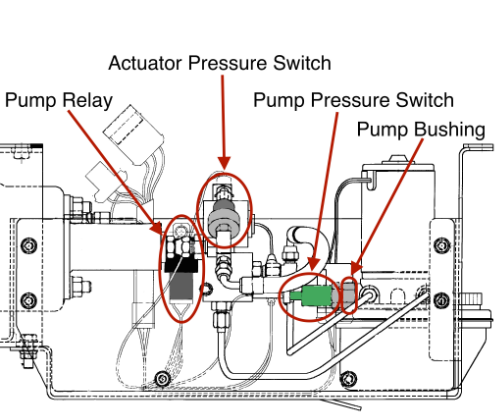
1995-2000 Pump Assembly

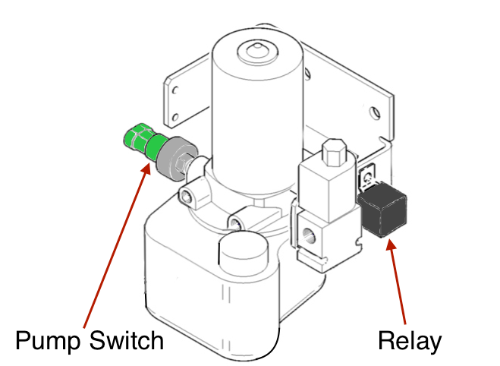
2001-2003 Pump Assembly

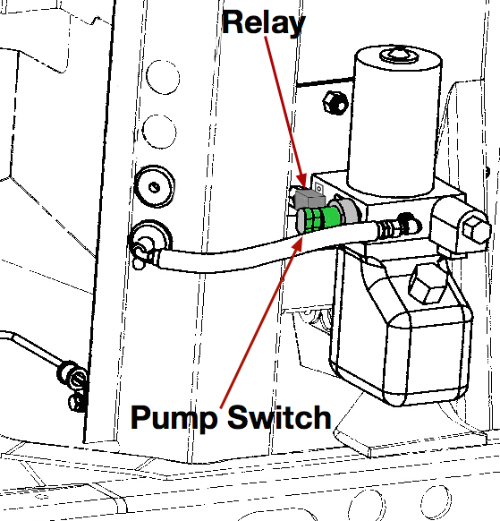
2004 Pump Assembly

Diagnostic Steps
Does the pump build pressure?
- Find out...
Section 1
For this step you will need a hydraulic pressure gauge that measures pressure up to 3000 psi.
Chock your wheels.
- Install your pressure gauge into a #4 JIC tee fitting.
- Install the tee fitting with gauge between the parking brake pump and the hose attached to it.
- Have a helper get into the driver seat.
- Turn your ignition key to the run position (do not start the coach).
- Press the yellow button on the dash "In".
- Place the coach into drive.
When the pump runs how much pressure does it build?
- Below 1500 psi. Go to section 2
- Above 1500 psi. Go to section 3
Section 2
Below 1500 psi
Leave the coach in the state it is in (See section 1-4.5.6.), and get a test light.
- Connect the test light across your battery and make sure it lights.
- Go to the pump solenoid coil, using your test light, unplug the pump coil plug and connect your test light across terminal A and B on the harness side.
- Does it light your test light?
- Yes. Plug the coil back into the harness then use a paper clip and see if it sticks to the coil body. If it does go to section 4.
- No. You have a bad connection on that circuit or a broken wire. If the fuse were blown the pump would not run at all. Jump power and ground to the coil and see if the pump runs.
Section 3
Above 1500 psi
Leave the coach in the state it is in (See section 1-4.5.6.), and get a test light.
- Locate the pump motor relay.
- With your test light grounded, probe the two small wires at the relay.
- Does it light your test light on one of the small wires?
- Yes. Your pressure switch has failed. Solution: Replace your pressure switch.
- No. Your relay has failed. Solution: Replace your pump motor relay.
Section 4
Leave the coach in the state it is in (See section 1-1.2.3.).
- Unplug your pump motor.
- Unplug the coil.
- Remove the coil from the solenoid by removing the nut on the end of the coil and sliding it off of the solenoid stem.
- Remove the solenoid from the pump assembly and slide the coil back on to the solenoid.
- Using test leads and a 12v battery source, energize the coil with power and ground over and over to see if you can hear the solenoid clicking.
- No. You have a failed solenoid. Solution: Replace your solenoid. (2004 P32 Pump assemblies do not have a replacement solenoid, those will need the pump replaced. Use part# W8005231-US)
- Yes. Clean the solenoid with brake clean and air pressure then reinstall it and retest.
- Does the pump build pressure now?
- Yes. Your pump solenoid either had debris in the needle seat, or the solenoid is failing. Recommendation would be to replace the solenoid.
- No. Go to section 5
- Does the pump build pressure now?
Section 5
This section applies to all years of the J71 electric over hydraulic pumps up to 2003.
- Remove one of the hydraulic lines from the external solenoid and install a #4 JIC plug and cap on the exposed ends.
- Turn your ignition key to the run position (do not start the coach).
- Press the yellow button on the dash "In".
- Place the coach into drive.
When the pump runs does it build pressure?
- Yes. Your pump solenoid has failed. Solution: Replace your pump solenoid.
- No. Go to section 6
Section 6
Replacing your poppet valve and spring.
- Place your coach into park and turn off your ignition switch.
- Remove the pressure switch in the side of you pump assembly.
- Remove the bushing that the switch was installed in.
- When removing the bushing you will find a small spring behind it.
- Remove the spring.
- Use a pencil shaped magnet and insert it into the bushing cavity in the pump. Pull back on the magnet and it will bring the poppet valve out with it.
- Inspect the spring and valve for damage, as well as seat for the poppet valve in the pump housing. If you see any damage, replace the damaged part.
- If no damage is found, your pump is most likely failed, but you can replace these two inexpensive parts, as sometimes the spring can be weak and not allow the poppet to seat properly allowing fluid to pass by.
If you need to find a wiring schematic for your coach, you can find them listed here https://www.ultrarvproducts.com/Workhorse-Manuals
Comments
0 comments
Please sign in to leave a comment.